
 The Milwaukee Flood of 2025 was a wake-up call for homeowners all over southeast Wisconsin.
In just a few days, heavy rain overwhelmed storm drains, saturated the soil, and pushed water
into thousands of basements that had “never had a problem before.”
At Zablocki Waterproofing, we heard the same story again and again:
“We thought our basement was fine—until this storm hit.”
This article walks through one real homeowner’s experience after the 2025 flood and shows
what actually happens during a professional basement waterproofing and drain tile project.
If you’re wondering what to do after water shows up in your basement—or how to choose the
right contractor—this case study will give you a honest, behind-the-scenes look.
- The 2025 Milwaukee Flood: When “Dry Basements” Suddenly Weren’t
- The Inspection: Honest Advice Instead of an Upsell
- Designing the System: Sump Crock, Drain Tile, and Everyday Practicality
- The Scheduling Hiccup: What Happens After a Major Storm
- Inside the Work: How a Real Drain Tile Installation Looks
- Surprises Behind the Walls—and How the Crew Responded
- The Final Test: The Next Big Rain
- Key Lessons Milwaukee Homeowners Can Take from This Case Study
- Thinking About Your Own Basement After the 2025 Flood?
1. The 2025 Milwaukee Flood: When “Dry Basements” Suddenly Weren’t
After days of steady rain, the ground around Milwaukee became fully saturated. When soil can’t absorb any more water, hydrostatic pressure builds up around foundation walls. That pressure forces water through tiny cracks, cold joints, and weak spots in older waterproofing systems.
One Milwaukee homeowner noticed water seeping in along the cinder block walls shortly after the storm. The seepage wasn’t a dramatic gush of water—it was a steady, slow leak that left staining on the walls and damp spots along the floor. Like many people, he realized that:
- Moisture had probably been building up for a while.
- The 2025 storm simply pushed the basement past its breaking point.
That’s when he called Zablocki Waterproofing for an inspection.
2. The Inspection: Honest Advice Instead of an Upsell
Owner John Zablocki came out to assess the damage. During the walkthrough, he listened to the homeowner’s concerns, checked the areas with the worst staining, and explained how water was getting in and why it would continue after every big rain if it wasn’t corrected.
The homeowner assumed that all of the finished basement walls would need to be torn out. Since there would already be demolition and debris, he even asked if the crew could remove every wall down to the studs.
Instead of agreeing to the bigger job, John explained that they only needed to cut the bottom two feet of drywall to access the footing and install a new interior drain tile system. Removing every wall would dramatically increase the cost—and it simply wasn’t necessary.
That moment stuck with the homeowner. Rather than upselling a bigger project, John chose the most practical, cost-effective solution. It set the tone for the entire job: do what’s needed, and do it right.
3. Designing the System: Sump Crock, Drain Tile, and Everyday Practicality
Once the scope of work was set, John walked through where the new system would go and how it
would function. The basement needed:
- An interior drain tile system along the problem walls.
- A properly sized sump crock and pump to discharge collected water.
- A layout that worked with the homeowner’s current setup, including server equipment.
Together, they picked a location for the sump crock that balanced performance and everyday usability. John also planned the route of the discharge line so it wouldn’t create a new trip hazard in the basement. The homeowner ran server equipment 24/7 in that space, so John even suggested mounting the equipment to the ceiling temporarily to keep it running safely during the project.
These details might sound small, but they’re what separate a basic waterproofing job from a thoughtful, homeowner-friendly solution.
4. The Scheduling Hiccup: What Happens After a Major Storm
When a large storm hits, waterproofing companies across Milwaukee get flooded with calls. The 2025 event was no exception—schedules filled quickly and projects stacked up.
In this case, the job was originally scheduled for a specific date. That day came and went without a visit, which understandably caused frustration. When the homeowner followed up, John apologized and explained that the crew had fallen behind on other flood-related jobs.
A week or two later, a crew arrived, but there was another mix-up: they were mistakenly dispatched for a different client with the same first name. Again, John took responsibility, apologized, and made sure the project moved forward as quickly as possible.
The homeowner later mentioned this in his review—not to criticize, but to point out an honest reality: after a historic flood, even the best contractors can struggle with scheduling. What mattered most to him was that the company owned the mistake and made it right.
5. Inside the Work: How a Real Drain Tile Installation Looks
Once the project officially began, the crew got to work. The photos from the job show what homeowners rarely get to see: the “guts” of a modern basement waterproofing system.
Step 1: Protecting the Space
The crew started by laying out protective coverings and plastic sheeting to shield the
homeowner’s belongings. They checked airflow around the server setup, made sure pets stayed
safely out of the work area, and reviewed the plan for where debris would go.
Step 2: Cutting the Trench
Using jackhammers and saws, they cut a trench along the inside perimeter of the basement walls—down to the footing. This is noisy, dusty work, but it’s essential. The trench is where the new drain tile will sit and is the pathway that directs water toward the sump crock.
As the concrete was removed, the crew hauled it out and exposed the footing. Any loose or damaged material was cleaned up to create a solid base for the new system.
Step 3: Installing Drain Tile and Gravel
Perforated drain tile was placed along the trench, surrounded by washed stone. This combination allows water to move freely into the pipe instead of sitting against the wall or slab joint. The drain tile carries water to the sump crock before it ever has a chance to push onto the basement floor.
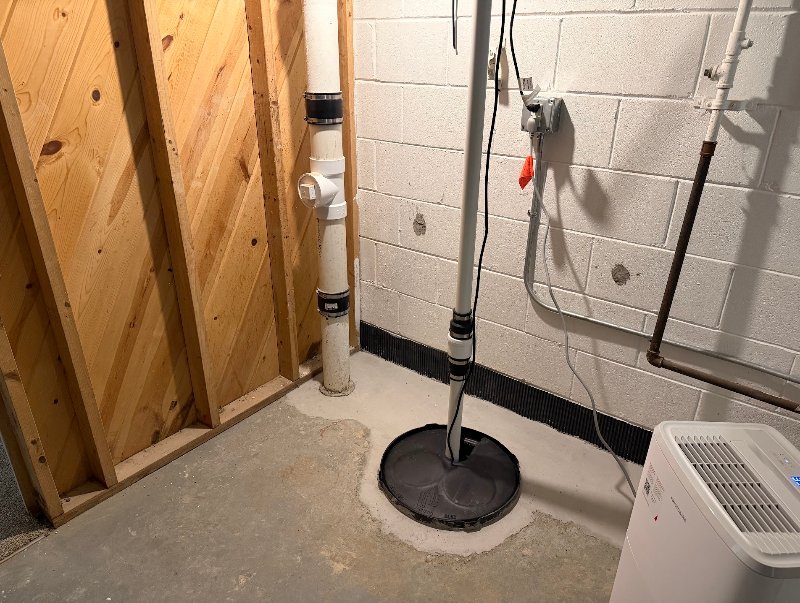
Step 4: Sump Crock Placement
The team installed the sump crock at the planned location, connecting it to the interior drain tile system. From there, a sump pump would discharge the water safely outside, away from the foundation. John and the homeowner had previously coordinated the route so that the discharge line wouldn’t become an obstacle.
Step 5: Wall and Moisture Details
Areas with visible staining and seepage were addressed carefully. In addition to cutting back the finished walls to reach the base, the crew used a waterproofing barrier along the interior side of the foundation wall so that any future moisture would drain down into the system instead of winding up on the floor.
Step 6: Re-Pouring the Concrete
After the drain tile and sump crock were installed, the crew poured new concrete over the trench. In the photos, you can see how the finished surface matches the existing slab; once it cures, it looks like the floor has always been that way.
From beginning to end, the project took about five days of on-site work.
6. Surprises Behind the Walls—and How the Crew Responded
Once part of the basement walls were removed, it became clear that the water damage was more extensive than anyone hoped. At that point, the homeowner decided it made sense to remove the remaining sections of wall.
John adjusted the price fairly to cover the additional demolition and disposal. There was no hard sell, no pressure—just a reasonable conversation and a revised plan.
During the wall removal, another issue appeared: a metal conduit connecting the circuit breaker to a distribution panel no longer sat flush against the wall. The homeowner assumed he’d need to hire an electrician later to fix it.
On the final day, the Zablocki crew quietly solved the problem. They shimmed the conduit with 2x4s and securely remounted it to the wall, leaving everything safe and sturdy. It wasn’t a big show; it was simply the right thing to do.
7. The Final Test: The Next Big Rain
With the concrete cured and the walls ready for future finishing, the basement looked clean and almost untouched—except now, there was a modern drain tile system and sump crock hidden along the perimeter.
A few weeks later, another heavy rain rolled through the Milwaukee area. This time, instead of watching water creep across the basement floor, the homeowner watched the sump crock fill and the pump do its job. The system worked exactly as designed, and the basement stayed dry.
8. Key Lessons Milwaukee Homeowners Can Take from This Case Study
Every home and every basement is different, but the 2025 flood taught a lot of homeowners the same lessons. Here are some of the big takeaways from this project:
- Big storms expose small problems.
A little moisture might not seem urgent—until a major rain turns it into a serious leak. - Honest contractors save you money.
In this case, the homeowner was talked out of unnecessary work and guided toward a
smarter, more affordable solution. - A proper waterproofing system is more than just a sump pump.
Interior drain tile, correct routing, and proper discharge are all part of a long-term fix. - Communication matters—but so does accountability.
Storm seasons are hectic. What matters most is whether your contractor takes responsibility when something goes wrong and follows through. - Professional work should look clean when it’s done.
A good waterproofing job blends into the existing slab and leaves the basement ready for finishing or storage.
9. Thinking About Your Own Basement After the 2025 Flood?
If your basement leaked during the Milwaukee Flood of 2025—or during any heavy rain since—your home is trying to tell you something. Water problems rarely fix themselves, and each storm can slowly make the situation worse.
At Zablocki Waterproofing, we’ve been helping homeowners across Milwaukee, Waukesha, Brookfield, Mequon, and the surrounding communities since 1985. We specialize in:
- Basement waterproofing and drain tile systems
- Sump crock and sump pump installation
- Foundation crack repair and wall reinforcement
- Excavation and exterior waterproofing solutions
Whether you’re dealing with active seepage or just want a professional opinion before the next big storm, we’re here to help.
Need a dry, safe basement you can trust again?
Call Zablocki Waterproofing at (414) 520-0122 for a free, no-pressure estimate and a clear explanation of your options. The 2025 flood was a tough moment for Milwaukee—but it also reminded homeowners how important a solid foundation and a dry basement really are. With the right system in place, the next big storm doesn’t have to be a disaster.